
■ 환경
이 프로젝트는 (세션방식과 + JW T 방식) 두가지를 복합적으로 적용한 프로젝트이다.
- spring boot 3.2.3
- JPA, gradle
- h2, mariadb , redis
- 프론트엔드 : thymelef, react 18.2
■ 소스
https://github.com/braverokmc79/spring-boot-react-oauth2
코드 보기
스프링부트 && 리액트
https://github.dev/braverokmc79/spring-boot-react-oauth2
[Spring Boot] OAuth2 소셜 로그인 가이드 (구글, 페이스북, 네이버, 카카오)
=>
https://deeplify.dev/back-end/spring/oauth2-social-login
Spring Boot Github 소셜 로그인 구현하기 (RestTemplate · WebClient)
https://inkyu-yoon.github.io/docs/Language/SpringBoot/GithubLogin
※ 1. Github OAuth 인증 흐름과 사전 준비
1. https://github.com/login/oauth/authorize?client_id={발급받은 client_ID} 주소를 사용자에게 띄워준다.
2. 사용자는 깃허브 로그인을 통해서 인증을 한다.
3. 인증을 성공할 시, 깃허브는 {우리가 설정한 콜백 URL}?code={인증코드} 로 code값을 쿼리 파라미터 형태로 보내준다.
4. 받은 code를 이용해서 https://github.com/login/oauth/access_token 로 {client_ID,client_Secret,code}를 POST요청으로 전송한다.
5. 깃허브는 access_token을 응답해서 서버측으로 보내준다.
6. 서버는 access_token을 https://api.github.com/user 로 담아서 GET 요청을 보낸다.
7. 깃허브는 로그인한 사용자의 정보를 서버측으로 보내준다.
8. 받은 사용자 정보를 사용한다.(회원가입 혹은 로그인)
Settings > Developer settings > New GitHub App 으로 OAuth 인증 기능 구현을 위한 Client Id 와 Client Secret 을 발급받아야 한다.
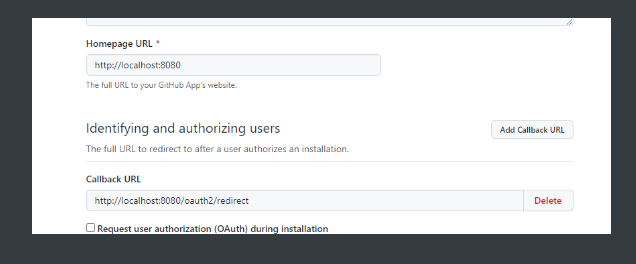
Homepage URL은 일단 로컬 환경에서 구현해볼것이기 때문에 localhost:8080 으로 해두었다.
Callback URL 은 어떤 사용자가 깃허브 로그인을 성공하면 깃허브 측에서 Code 를 쿼리 파라미터로 보내주는데, 그 파라미터를 받을 주소이다.
나는 http://localhost:8080/oauth2/redirect 로 설정하였다.
http://localhost:8080/oauth2/redirect?code={코드~~} 이런식으로 리다이렉트 될 것이다.
정상적으로 등록을 마치면 Client ID와 Client Secret정보를 얻을 수 있다.
Client Secret은 민감정보 이므로 노출되지 않도록 주의하자.
※ 2. 흐름
1) oauth2 로그인 페이지 -> oauth2 github 에서 인증후 로그인되면 callback 호출
2)oauth2 callback 로  호출
.redirectionEndpoint(rE ->rE.baseUri("/oauth2/callback/*"))
3)oAuth2UserService 에서 회원이 존재 하지 않으면 가입처리되고, 존재하면 해당 아이디를 호출하여 정보를 가져온다
 .userInfoEndpoint(userInfoEndpointConfig -> userInfoEndpointConfig.userService(oAuth2UserService))
4)성공시 oAuth2SuccessHandler 호출 되며 토큰 생성및 쿠키에 저장 시킨다.
.successHandler(oAuth2SuccessHandler)
5)OAuth2.0 흐름 시작을 위한 엔드 포인트  임의 주소 /api/auth/authorize 추가하면
 //http://localhost:8080/oauth2/authorization/github url 주소와 동일하게
 //http://localhost:8080/api/auth/authorize/github  url 주소를 입력시 OAuth2 처리 페이지로 이동 처리된다.
.authorizationEndpoint(anf -> anf.baseUri("/api/auth/authorize"))
oauth2 기본 설정 확인 방법 :
http://localhost:포트번호/oauth2/authorization/github
스프링부트에서 기본적으로 oauth2 설정만 해주면 다음과 같이 localhost:포토번호/oauth2/authorization/github 를 입력하면
github 로그인화면으로 이동 처리 된다.
이것을 baseUri("/api/auth/authorize") 으로 임의 url 주소만 설정만 해주면 해당
/oauth2/authorization/ 주소는 작동이 안되며 다음 /api/auth/authorize 주소로
http://localhost:5000/api/auth/authorize 주소로 oauth2 인증 진행처리 된다.
즉, baseUri 디폴트 값은 /oauth2/authorization 이다.
http://localhost:5000/oauth2/authorization/github
http://localhost:5000/api/auth/authorize
1. 라이브러리 추가
implementation 'org.springframework.boot:spring-boot-starter-oauth2-client'
2.properties 설정
1) application.properties
개발 로컬에 적용
spring.profiles.active=dev
배포 실질 운영시 보통 prod 를 사용하나 여기서는 real 이라는 이름으로 사용했다.
spring.profiles.active=real
2)개발 properties
application-dev.properties
#애플리케이션 포트 설정
server.port = 5000
spring.output.ansi.enabled=always
spring.jpa.open-in-view=false

#redis 설정
spring.data.redis.lettuce.pool.max-active=10
spring.data.redis.lettuce.pool.max-idle=10
spring.data.redis.lettuce.pool.min-idle=2
spring.data.redis.host=localhost
spring.data.redis.port=6379
spring.data.redis.password=test1234


#MariaDB server
spring.datasource.driver-class-name=org.mariadb.jdbc.Driver
spring.datasource.url=jdbc:mariadb://localhost:3306/shop?serverTimezone=UTF-8&allowPublicKeyRetrieval=true&useSSL=false
spring.datasource.username=shop
spring.datasource.password=1111


#접근토큰시간: 5시간  #60*60*5*1000 =18000000    #샘플테스트 :30초 ==>30*1000=30000
spring.jwt.token.access-expiration-time=60000
#갱신토큰시간: 7일  #60*60*24*7*1000=604800000  #샘플테스트: 1분 ===>60000
spring.jwt.token.refresh-expiration-time=120000

#oauth2 frontend 주소
serverRedirectFrontUrl=http://localhost:3000

#깃허브
#http://localhost:5000/oauth2/authorization/github
spring.security.oauth2.client.registration.github.client-id=752037935070eb6d2dc3
spring.security.oauth2.client.registration.github.client-secret=e0f5cde1030674aa98308a8ca9475692e310514a
spring.security.oauth2.client.registration.github.redirect-uri={baseUrl}/oauth2/callback/{registrationId}
spring.security.oauth2.client.registration.github.scope=user:email, read:user

#provider 는 리소스 제공자인 github 에 대한 정보를 명시한 것, 따라서 Todo 애플리케이션이 소셜 로그인요청을 할때 해당 주소로 리다이렉트 한다.
spring.security.oauth2.client.provider.github.authorization-uri=https://github.com/login/oauth/authorize
#token-uri 는 깃허브에 액세스 가능한 엑세스 토큰을 받아오기 위한 주소
spring.security.oauth2.client.provider.github.token-uri=https://github.com/login/oauth/access_token
#유저의 정보를 가져오기 위해서는 액세스 토큰이필요하므로 우리는 token-uri 를 이용해 먼저 액세스 토큰을 받은후, user-info-uri 로 사용자의 정보를 요청할때 토큰을 함께 보낸다.
spring.security.oauth2.client.provider.github.user-info-uri=https://api.github.com/user


#구글
spring.security.oauth2.client.registration.google.client-id=dsa
spring.security.oauth2.client.registration.google.client-secret=313123
spring.security.oauth2.client.registration.google.scope=profile,email


#네이버
# registration
spring.security.oauth2.client.registration.naver.client-id=클라이언트아이디
spring.security.oauth2.client.registration.naver.client-secret=클라이언트시크릿
spring.security.oauth2.client.registration.naver.redirect-uri=http://localhost:8080/login/oauth/code/naver
spring.security.oauth2.client.registration.naver.authorization-grant-type=authorization_code
spring.security.oauth2.client.registration.naver.scope=name,email.profile_image
spring.security.oauth2.client.registration.naver.client-name=Naver

# provider
spring.security.oauth2.client.provider.naver.authorization-uri=https://nid.naver.com/oauth2.0/authorize
spring.security.oauth2.client.provider.naver.token-uri=https://nid.naver.com/oauth2.0/token
spring.security.oauth2.client.provider.naver.user-info-uri=https://openapi.naver.com/v1/nid/me
spring.security.oauth2.client.provider.naver.user-name-attribute=response

## 카카오 ##
# registration
spring.security.oauth2.client.registration.kakao.client-id=클라이언트아이디
spring.security.oauth2.client.registration.kakao.client-secret=클라이언트시크릿
spring.security.oauth2.client.registration.kakao.redirect-uri=http://localhost:8080/login/oauth2/code/kakao
spring.security.oauth2.client.registration.kakao.authorization-grant-type=authorization_code
spring.security.oauth2.client.registration.kakao.scope=profile_nickname,account_email,profile_image
spring.security.oauth2.client.registration.kakao.client-name=Kakao
spring.security.oauth2.client.registration.kakao.client-authentication-method=POST

# provider
spring.security.oauth2.client.provider.kakao.authorization-uri=https://kauth.kakao.com/oauth/authorize
spring.security.oauth2.client.provider.kakao.token-uri=https://kauth.kakao.com/oauth/token
spring.security.oauth2.client.provider.kakao.user-info-uri=https://kapi.kakao.com/v2/user/me
spring.security.oauth2.client.provider.kakao.user-name-attribute=id


#실행되는 쿼리 콘솔 출력
spring.jpa.properties.hibernate.show_sql=true

#콘솔창에 출력되는 쿼리를 가독성이 좋게 포맷팅
spring.jpa.properties.hibernate.format_sql=true

#쿼리에 물음표로 출력되는 바인드 파라미터 출력
logging.level.org.hibernate.type.descriptor.sql=trace

#create , update , none
spring.jpa.hibernate.ddl-auto=update


#파일 한 개당 최대 사이즈
spring.servlet.multipart.maxFileSize=20MB
#요청당 최대 파일 크기
spring.servlet.multipart.maxRequestSize=100MB

#상품 이미지 업로드 경로
itemImgLocation=/uploads/shop/item

#리소스 업로드 경로
uploadPath=file:/uploads/shop/

#기본 batch size 설정
spring.jpa.properties.hibernate.default_batch_fetch_size=1000
3)운영 properties
application-real.properties
리다이렉트할 주소 적어준다.
serverRedirectFrontUrl=https://ma7front.p-e.kr
spring.security.oauth2.client.registration.github.redirect-uri 에서 콜백할 주소도 직접 적어준다.
로컬에서는 다음과 같이설정해도 적용이 되나, 운영서버에서는 작동이 안된다.
spring.security.oauth2.client.registration.github.redirect-uri={baseUrl}/oauth2/callback/{registrationId}
{baseUrl}/oauth2/callback/{registrationId} 과 같이 설정할경우 nginx 와 연동되 실질적인 운영에서는
invalid_request 에러가 발생한다.
참조 : [OAuth2] 구글 로그인 400 오류 : invalid_request 에러 해결책
따라서, 직접적으로 frontend 주소를 적도록 하자
spring.security.oauth2.client.registration.github.redirect-uri=https://ma7server.p-e.kr/oauth2/callback/{registrationId}
#oauth2 frontend 주소
serverRedirectFrontUrl=https://ma7front.p-e.kr


#깃허브
#http://localhost:5000/oauth2/authorization/github
spring.security.oauth2.client.registration.github.client-id=깃허브Client_ID
spring.security.oauth2.client.registration.github.client-secret=깃허브Client_SECRET
spring.security.oauth2.client.registration.github.redirect-uri=https://ma7server.p-e.kr/oauth2/callback/{registrationId}
spring.security.oauth2.client.registration.github.scope=user:email, read:user

#provider 는 리소스 제공자인 github 에 대한 정보를 명시한 것, 따라서 Todo 애플리케이션이 소셜 로그인요청을 할때 해당 주소로 리다이렉트 한다.
spring.security.oauth2.client.provider.github.authorization-uri=https://github.com/login/oauth/authorize
#token-uri 는 깃허브에 액세스 가능한 엑세스 토큰을 받아오기 위한 주소
spring.security.oauth2.client.provider.github.token-uri=https://github.com/login/oauth/access_token
#유저의 정보를 가져오기 위해서는 액세스 토큰이필요하므로 우리는 token-uri 를 이용해 먼저 액세스 토큰을 받은후, user-info-uri 로 사용자의 정보를 요청할때 토큰을 함께 보낸다.
spring.security.oauth2.client.provider.github.user-info-uri=https://api.github.com/user
3.SecurityConfig 설정
securityCofig 에 다음 코드를 추가해 준다.
1~ 5번 코드 순서 처럼 oauth2 인증처리 된다.
 //oauth2Login 로그인 처리
        http.oauth2Login(oauth2Configurer -> oauth2Configurer
                //1) oauth2 로그인 페이지  -> oauth2 github 에서 인증후 로그인되면  callback 호출
                //.loginPage("/oauth2/login")

                //2)oauth2 callback 로  호출
                .redirectionEndpoint(rE ->rE.baseUri("/oauth2/callback/*"))
                //3)oAuth2UserService 에서 회원이 존재 하지 않으면 가입처리되고, 존재하면 해당 아이디를 호출하여 정보를 가져온다
                 .userInfoEndpoint(userInfoEndpointConfig -> userInfoEndpointConfig.userService(oAuth2UserService))
                //4)성공시 oAuth2SuccessHandler 호출 되며 토큰 생성및 쿠키에 저장 시킨다.
               .successHandler(oAuth2SuccessHandler)
                //5)OAuth2.0 흐름 시작을 위한 엔드 포인트  임의 주소 /api/auth/authorize 추가하면
                //http://localhost:8080/oauth2/authorization/github url 주소와 동일하게
                //http://localhost:8080/api/auth/authorize/github  url 주소를 입력시 OAuth2 처리 페이지로 이동 처리된다.
               .authorizationEndpoint(anf -> anf.baseUri("/api/auth/authorize"))
        )
        //인증 실패시 Oauth2 흐름으로 넘어가는 것을 막고 응답코드 403을 반환처리
        .exceptionHandling(exceptionConfig->exceptionConfig.authenticationEntryPoint(new Http403ForbiddenEntryPoint()));
전체 securityCofig
package com.shop.config;

import com.querydsl.jpa.impl.JPAQueryFactory;
import com.shop.config.filter.JwtAuthenticationFilter;
import com.shop.config.oauth2.OAuth2SuccessHandler;
import com.shop.exception.CustomAuthenticationEntryPoint;
import com.shop.service.api.oauth2.OAuth2UserService;
import jakarta.persistence.EntityManager;
import lombok.RequiredArgsConstructor;
import org.springframework.context.annotation.Bean;
import org.springframework.context.annotation.Configuration;
import org.springframework.security.config.annotation.web.builders.HttpSecurity;
import org.springframework.security.config.annotation.web.configuration.EnableWebSecurity;
import org.springframework.security.config.annotation.web.configurers.HeadersConfigurer;
import org.springframework.security.crypto.bcrypt.BCryptPasswordEncoder;
import org.springframework.security.crypto.password.PasswordEncoder;
import org.springframework.security.web.SecurityFilterChain;
import org.springframework.security.web.authentication.Http403ForbiddenEntryPoint;
import org.springframework.security.web.authentication.UsernamePasswordAuthenticationFilter;
import org.springframework.security.web.util.matcher.AntPathRequestMatcher;


@Configuration
@EnableWebSecurity
@RequiredArgsConstructor
//@EnableGlobalMethodSecurity(prePostEnabled = true)//spring boot 3 이상 부터 기본값 true 업데이트 됩
public class SecurityConfig  {

    private  final JwtAuthenticationFilter jwtAuthenticationFilter;

    private final OAuth2UserService oAuth2UserService;

    //OAuth2 로그인 성공시 토큰 생성
    private final OAuth2SuccessHandler oAuth2SuccessHandler;

    @Bean
    public PasswordEncoder passwordEncoder(){
        return new BCryptPasswordEncoder();
    }


    @Bean
    public JPAQueryFactory queryFactory(EntityManager em){
        return new JPAQueryFactory(em);
    }


    @Bean
    public SecurityFilterChain filterChain(HttpSecurity http) throws Exception {
        //JWT 를 사용하면  csrf 보안이 설정 필요없다. 그러나 여기 프로젝트에서는 세션방식과 jwt 방식을 둘다적용 중이라 특정 페이지만 제외 처리
        http.csrf(c -> {
            c.ignoringRequestMatchers("/admin/**","/api/**", "/oauth2/**" ,"/error/**");
        });

        //1.csrf 사용하지 않을 경우 다음과 같이 설정
        //http.csrf(AbstractHttpConfigurer::disable);

        //2. h2 접근 및 iframe 접근을 위한 SameOrigin (프레임 허용) & 보안 강화 설정 할경우
        //http.headers((headers) -> headers.frameOptions(HeadersConfigurer.FrameOptionsConfig::disable));
        http.headers(headers -> headers.frameOptions(HeadersConfigurer.FrameOptionsConfig::sameOrigin));

        //3.HTTP 기본 인증 만 할경우 다음과 같이 처리
        //httpSecurity.formLogin(AbstractHttpConfigurer::disable);

        //3.jwt token 만 인증 처리 할경우  basic 인증을 disable 한다. 그러나 이 프로젝트는 세션+jwt 이라 disable 설정은 하지 않는다.
        //httpSecurity.httpBasic(AbstractHttpConfigurer::disable);

        //4.JWT 만 사용할경우 세션 관리 상태 없음 설정 그러나, 이 프로젝트는  세션 + JWT 를 사용하지 때문에 주석
        //http.sessionManagement(sessionManagementConfigurer ->sessionManagementConfigurer.sessionCreationPolicy(SessionCreationPolicy.STATELESS));

        //세션방식의  form 로그인 처리
        http.formLogin(login-> login
                        .loginPage("/members/login")
                        .defaultSuccessUrl("/", true)
                        .usernameParameter("email")
                        .failureUrl("/members/login/error"))
                .logout(logoutConfig ->logoutConfig.logoutRequestMatcher(new AntPathRequestMatcher("/members/logout")).logoutSuccessUrl("/"))
                .exceptionHandling(exceptionConfig-> exceptionConfig.authenticationEntryPoint(new Http403ForbiddenEntryPoint()));


        http.authorizeHttpRequests(request->request
                .requestMatchers("/css/**", "/js/**", "/img/**","/images/**").permitAll()
                .requestMatchers("/", "/members/**", "/item/**", "/main/**", "/error/**" ).permitAll()

                 //JWT 일반 접속 설정
                .requestMatchers("/auth/**",  "/oauth2/**").permitAll()
                .requestMatchers("/api/todo/**" ,"/api/auth/**", "/api/oauth2/**" ).permitAll()

                //JWT 관리자 페이지 설정
                .requestMatchers( "/api/admin/**").hasAuthority("ADMIN")


                //세션방식  --> 관리자 페이지는 설정
                .requestMatchers("/admin/**").hasAuthority("ADMIN")
                .anyRequest().authenticated()
        );

         //api 페이지만  JWT  필터 설정(jwtAuthenticationFilter 에서 shouldNotFilter 메서드로 세션 페이지는 필터를 제외 시켰다.)
        http.addFilterBefore(jwtAuthenticationFilter, UsernamePasswordAuthenticationFilter.class)

        //에외 처리
        .exceptionHandling(exceptionConfig->exceptionConfig.authenticationEntryPoint(new CustomAuthenticationEntryPoint()) );

        //oauth2Login 로그인 처리
        http.oauth2Login(oauth2Configurer -> oauth2Configurer
                //1) oauth2 로그인 페이지  -> oauth2 github 에서 인증후 로그인되면  callback 호출
                //.loginPage("/oauth2/login")

                //2)oauth2 callback 로  호출
                .redirectionEndpoint(rE ->rE.baseUri("/oauth2/callback/*"))
                //3)oAuth2UserService 에서 회원이 존재 하지 않으면 가입처리되고, 존재하면 해당 아이디를 호출하여 정보를 가져온다
                 .userInfoEndpoint(userInfoEndpointConfig -> userInfoEndpointConfig.userService(oAuth2UserService))
                //4)성공시 oAuth2SuccessHandler 호출 되며 토큰 생성및 쿠키에 저장 시킨다.
               .successHandler(oAuth2SuccessHandler)
                //5)OAuth2.0 흐름 시작을 위한 엔드 포인트  임의 주소 /api/auth/authorize 추가하면
                //http://localhost:8080/oauth2/authorization/github url 주소와 동일하게
                //http://localhost:8080/api/auth/authorize/github  url 주소를 입력시 OAuth2 처리 페이지로 이동 처리된다.
               .authorizationEndpoint(anf -> anf.baseUri("/api/auth/authorize"))
        )
        //인증 실패시 Oauth2 흐름으로 넘어가는 것을 막고 응답코드 403을 반환처리
        .exceptionHandling(exceptionConfig->exceptionConfig.authenticationEntryPoint(new Http403ForbiddenEntryPoint()));

       return http.build();
    }


}
위와 같이 시큐리티를 설정했다면 http://localhost:포토번호/oauth2/authorization/github 로 입력해서 들어가보면
http://localhost:포토번호 으로 정상적으로 디라이렉트 하는 것을 확인할 수 있다.
4.OAuth2UserService
Member
package com.shop.entity;


import com.shop.constant.Role;
import com.shop.dto.MemberFormDto;
import com.shop.entity.base.BaseEntity;
import jakarta.persistence.*;
import lombok.Builder;
import lombok.Getter;
import lombok.Setter;
import lombok.ToString;
import org.springframework.security.crypto.password.PasswordEncoder;

@Entity
@Table(name = "member")
@Getter
@Setter
@ToString
public class Member extends BaseEntity {

    @Id
    @Column(name = "member_id")
    @GeneratedValue(strategy = GenerationType.IDENTITY)
    private Long id;

    private String username;

    private String name;

    @Column(unique = true)
    private String email;

    private String password;

    private String address;

    @Enumerated(EnumType.STRING)
    private Role role;

    private String authProvider; //이후 OAuth 에서 사용할 유저 정보 제공자 : github

    private String authProviderId;


    public static Member createMember(MemberFormDto memberFormDto, PasswordEncoder passwordEncoder) {

        Member member = new Member();
        member.setName(memberFormDto.getName());
        member.setUsername(memberFormDto.getUsername());
        member.setEmail(memberFormDto.getEmail());
        member.setAddress(memberFormDto.getAddress());
        String password = passwordEncoder.encode(memberFormDto.getPassword());
        member.setPassword(password);
        member.setRole(Role.USER);
        //member.setRole(Role.ADMIN);
        return member;
    }


    public static Member createMember(MemberFormDto memberFormDto) {

        Member member = new Member();
        member.setName(memberFormDto.getName());
        member.setUsername(memberFormDto.getUsername());
        member.setEmail(memberFormDto.getEmail());
        member.setAddress(memberFormDto.getAddress());
        member.setPassword(memberFormDto.getPassword());
        member.setRole(Role.USER);

        return member;
    }


}
OAuth2UserService
    public OAuth2User loadUser(OAuth2UserRequest userRequest) throws OAuth2AuthenticationException {
        final OAuth2User oAuth2User =super.loadUser(userRequest);

        final String username=oAuth2User.getAttributes().get("login").toString();
        final String authProviderId=oAuth2User.getAttributes().get("id").toString();
        String email=null;
        if(oAuth2User.getAttributes().get("email")!=null){
            email=oAuth2User.getAttributes().get("email").toString();
        }

        final String authProvider=userRequest.getClientRegistration().getClientName();
        String OAUTH2_ID= authProvider+"_"+authProviderId;


        Member member=null;
        if(memberRepository.existsByAuthProviderId(OAUTH2_ID)){
            member = memberRepository.findMemberByAuthProviderId(OAUTH2_ID);
        }else{
            if(StringUtils.hasText(email)){
                Member memberEntity = memberRepository.findByEmail(email);
                if( memberRepository.findByEmail(email)!=null){
                    memberEntity.setAuthProvider(authProvider);
                    memberEntity.setAuthProviderId(OAUTH2_ID);
                    member=memberEntity;
                }
            }
        }

        if(member==null)   member=createOauth2Member( authProvider , username,  OAUTH2_ID,   email);
        return new PrincipalDetails(member, oAuth2User.getAttributes());
    }
package com.shop.service.api.oauth2;


import com.fasterxml.jackson.databind.ObjectMapper;
import com.shop.config.auth.PrincipalDetails;
import com.shop.constant.Role;
import com.shop.dto.MemberDto;
import com.shop.entity.Member;
import com.shop.repository.MemberRepository;
import lombok.RequiredArgsConstructor;
import lombok.extern.log4j.Log4j2;
import org.springframework.security.oauth2.client.userinfo.DefaultOAuth2UserService;
import org.springframework.security.oauth2.client.userinfo.OAuth2UserRequest;
import org.springframework.security.oauth2.core.OAuth2AuthenticationException;
import org.springframework.security.oauth2.core.user.OAuth2User;
import org.springframework.stereotype.Service;
import org.springframework.transaction.annotation.Transactional;
import org.springframework.util.StringUtils;

@Service
@Log4j2
@RequiredArgsConstructor
@Transactional
public class OAuth2UserService extends DefaultOAuth2UserService {

    private final MemberRepository memberRepository;

    @Override
    public OAuth2User loadUser(OAuth2UserRequest userRequest) throws OAuth2AuthenticationException {
        log.info("★★★★★★★★★★ OAuth2UserService loadUse");

        //1.DefaultOauth2UserService 의 기존 loadUser 를 호출한다. 이 메서드가 user-info-uri 를 이용해 사용자 정보를 가져오는 부분이다.
        final OAuth2User oAuth2User =super.loadUser(userRequest);

        try{
            //2.디버깅을 돕기 위해 OAuth2User 사용자 정보를 출력
            log.info("******** OAuth2User attributes : {}", new ObjectMapper().writeValueAsString(oAuth2User.getAttributes())) ;
        }catch (Exception e){
            e.printStackTrace();
        }

        log.info("******** OAuth2UserService loadUser : {} , getAttributes() : {}", oAuth2User , oAuth2User.getAttributes());

        //3.login 필드를 가져온다.
        final String username = oAuth2User.getAttributes().get("login").toString();
        final String authProviderId = oAuth2User.getAttributes().get("id").toString();
        String email =null;
        if(oAuth2User.getAttributes().get("email")!=null){
            email = oAuth2User.getAttributes().get("email").toString();
        }
        final String authProvider=userRequest.getClientRegistration().getClientName();


        //OAUTH2_ID = Oauth2(naver,github,google)_authProviderId    ex) Github_1234
        String OAUTH2_ID= authProvider+"_"+authProviderId;


        /**
         각 소셜 로그인 제공자가 반환하는 유저 정보, 즉 attributes 에 들어 있는 내용은 제공자 마다 각각 다르다.
         email을 아이디로 사용하는 제공자는 email 필드가 있을 것이고, 깃허브의 경우에는 login 필드가 있다.
         따라서 여러 소셜 로그인과 통홥하려면 이 부분을 알맞게 파싱해야 한다.
         *
         */

               //authProvider :GitHub
        Member member=null;

        //1.OAUTH2_ID 를 통해 , DB 회원 테이블에 OAUTH2 로 가입된 회원이 존재하면 해당 정보를 가져온다.(바로 로그인 처리)
        if(memberRepository.existsByAuthProviderId(OAUTH2_ID)){
            log.info("======>1.기존에 가입된 OAUTH2 회원  OAUTH2_ID 확인후 바로 로그인 처리");
            member = memberRepository.findMemberByAuthProviderId(OAUTH2_ID);
        }else{
            //2.신규가입처리 - 1) DB 회원 테이블에 OAUTH2 로 가입된 정보가 없다. 따라서 신규가입처리 진행하는데, 이메일이 있을 경우를 다음과 같이 확인 가입처리 한다.
            //OAUTH2 에서 가져온 email 정보가 존재 한다. 해당 이메일이 DB 에 존재하는지 확인 ,
            //만약에 존재 할경우 해당 정보를 가져와서 AuthProvider , AuthProviderId  컬럼값만 업데이트 처리한다.

            if(StringUtils.hasText(email)){
                // DB 에서 해당 이메일로 회원정보를 가져온다.
                Member memberEntity = memberRepository.findByEmail(email);
                if(memberEntity!=null){
                    //1)널이 아니면 DB 데이터에 업데이트 처리
                    log.info("======>2-1.OAUTH 이메일 로 업데이트 후 회원가입 처리");
                    memberEntity.setAuthProvider(authProvider);
                    memberEntity.setAuthProviderId(OAUTH2_ID);
                    member=memberEntity;
                }
            }
        }

        if(member==null){
            //2.신규가입처리 - 2)  그냥 전부 새롭게 신규 등록
            log.info("======>2-2.OAUTH  새롭게 신규 등록");
            member=createOauth2Member( authProvider , username,  OAUTH2_ID,   email);
        }


        PrincipalDetails principalDetails = new PrincipalDetails(member, oAuth2User.getAttributes());
        log.info("========================2 Oauth2User  토큰 반환시 정보값 ================ {}", principalDetails.getMember().getId());
        return principalDetails;
    }


    //oauth2 DB 등록
    private Member createOauth2Member(String authProvider ,String username, String OAUTH2_ID, String  email){
        MemberDto memberDto = MemberDto.builder()
                .username(authProvider+"_"+username)
                .email(email)
                .authProvider(authProvider)
                .authProviderId(OAUTH2_ID)
                .role(Role.USER)
                .build();
        Member member = MemberDto.oauth2CreateMember(memberDto);
        return memberRepository.save(member);
    }


}
1. application.properties 에 설정한 user-info-uri 값들의 사용자 정보를 가져온다.
2. oAuth2User 에 로그인이 성공하면 다음과 같이 oAuth2User.getAttributes().get("login") 과 oAuth2User.getAttributes().get("id") 를 통해
정보를 가져올수 있다.
여기서는
username 은 github 가입시 아이디값이고,
authProvider 은 github 등록된 123456 의 pk 와 같은 아이디 값이다. 그리고 authProvider은 GitHub 값이다.
        final String username = oAuth2User.getAttributes().get("login").toString();
        final String authProviderId = oAuth2User.getAttributes().get("id").toString();
        String email =null;
        if(oAuth2User.getAttributes().get("email")!=null){
            email = oAuth2User.getAttributes().get("email").toString();
        }
        final String authProvider=userRequest.getClientRegistration().getClientName();


        //OAUTH2_ID = Oauth2(naver,github,google)_authProviderId    ex) Github_1234
        String OAUTH2_ID= authProvider+"_"+authProviderId;
ex)GitHub_18599682
OAUTH2_ID =GitHub+"_"+123456
따라서, OAUTH2_ID 값과
username(authProvider+"_"+username)
username =GitHub_깃허브등록시 아이디값으로 저장 처리 한다.
굳이 이와 같이 아이디값에 oauth2 를 넣어주면서 저장처리를 하지않아도 되지만 이프로젝트에서는 이렇게 진행하였다.
중요한것은 아이디값이 unique 한값으로 저장 되야 한다는 것이다.
5. PrincipalDetails
package com.shop.config.auth;

import com.shop.constant.Role;
import com.shop.entity.Member;
import lombok.Getter;
import lombok.extern.log4j.Log4j2;
import org.springframework.security.core.GrantedAuthority;
import org.springframework.security.core.authority.SimpleGrantedAuthority;
import org.springframework.security.core.userdetails.UserDetails;
import org.springframework.security.oauth2.core.user.OAuth2User;


import java.io.Serial;
import java.util.*;
import java.util.stream.Collectors;

//시큐리티가 login 주소 요청이 오면 낚아채서 로그인을 진행시킨다
//로그인을 진행이 완료가 되면 시큐리티  session 을 만들어 줍니다. (security ContectHolder) 세션 정보 저장
//오브젝트 => Authentication 타입 객체
//Authentication 안에 User 정보가 있어야 함.
//User 오브젝트타입 => UserDetails 타입 객체

//Security Session => Authentication   => UserDetails
@Getter
@Log4j2
public class PrincipalDetails implements UserDetails, OAuth2User {


    @Serial
    private static final long serialVersionUID = 1L;
    private final Member member; // 콤포지션
    private final long id;
    private final String idStr; //아이디를 문자열로 반환
    private final String email;
    private final String username;


    /** 다음은  OAuth2User 를 위한 필드 */
    private String authProviderId;
    private Collection<? extends GrantedAuthority> authorities;
    private Map<String, Object> attributes;


    public PrincipalDetails(Member member, Map<String, Object> attributes){
        this.authProviderId=member.getAuthProviderId();
        this.attributes=attributes;
        this.authorities= Collections.singletonList(new SimpleGrantedAuthority("ROLE_USER"));

        this.id=member.getId();
        this.idStr=member.getId().toString();
        this.username=member.getUsername();
        this.email = member.getEmail();
        this.member = member;
    }


    // 일반로그인
    public PrincipalDetails(Member member) {
        this.id=member.getId();
        this.idStr=member.getId().toString();
        this.username=member.getUsername();
        this.email = member.getEmail();
        this.member = member;
        this.authorities=getAuthorities();
    }


    /**
     * 사용자에게 부여된 권한을 반환합니다. null을 반환할 수 없습니다.
     */
    // 해당 User 의 권한을 리턴하는 곳!!
    //권한:한개가 아닐 수 있음.(3개 이상의 권한)
    @Override
    public Collection<? extends GrantedAuthority> getAuthorities() {
        Collection<GrantedAuthority> collector=new ArrayList<>();
        log.info("********* 시큐리티 로그인 :" +member.getRole().toString());
        collector.add(()-> member.getRole().toString());
        return collector;
    }


    /**
     * 사용자를 인증하는 데 사용된 암호를 반환합니다.
     */
    @Override
    public String getPassword() {
        return member.getPassword();
    }

    /**
     * 사용자를 인증하는 데 사용된 사용자 이름을 반환합니다. null을 반환할 수 없습니다.
     */
    @Override
    public String getUsername() {
        return member.getUsername();
    }

    /**
     * 사용자의 계정이 만료되었는지 여부를 나타냅니다. 만료된 계정은 인증할 수 없습니다.
     */
    @Override
    public boolean isAccountNonExpired() {
        return true;
    }

    /**
     * 사용자가 잠겨 있는지 또는 잠금 해제되어 있는지 나타냅니다. 잠긴 사용자는 인증할 수 없습니다.
     */
    @Override
    public boolean isAccountNonLocked() {
        return true;
    }

    /**
     * 사용자의 자격 증명(암호)이 만료되었는지 여부를 나타냅니다. 만료된 자격 증명은 인증을 방지합니다.
     */
    @Override
    public boolean isCredentialsNonExpired() {
        return true;
    }

    /**
     * 사용자가 활성화되었는지 비활성화되었는지 여부를 나타냅니다. 비활성화된 사용자는 인증할 수 없습니다.
     */
    @Override
    public boolean isEnabled() {
        // 우리 사이트 1년동안 회원이 로그인을 안하면!! 휴먼 계정으로 하기로 함.
        // 현재시간-로긴시간=>1년을 초과하면 return false;
        return true;
    }

    public boolean isWriteEnabled() {
        if (member.getRole().equals(Role.USER))
            return false;
        else
            return true;
    }


    public boolean isWriteAdminAndManagerEnabled() {
        if (member.getRole().equals(Role.ADMIN )|| member.getRole().equals(Role.USER))
            return true;
        else
            return false;
    }


    /**
     * 다음 OAuth2User 를 위한 메소드
     * @return
     */
    @Override
    public Map<String, Object> getAttributes() {
        return this.attributes;
    }

    @Override
    public String getName() {
        return this.authProviderId; //name 대신 id를 리턴한다.
    }


}
6. OAuth2SuccessHandler OAuth2 로그인 성공시 토큰 생성 처리
package com.shop.config.oauth2;

import com.shop.dto.api.jwt.TokenDto;
import com.shop.service.api.jwt.JwtTokenProviderService;
import jakarta.servlet.ServletException;
import jakarta.servlet.http.HttpServletRequest;
import jakarta.servlet.http.HttpServletResponse;
import lombok.RequiredArgsConstructor;
import lombok.extern.log4j.Log4j2;
import org.checkerframework.checker.units.qual.A;
import org.springframework.beans.factory.annotation.Autowired;
import org.springframework.beans.factory.annotation.Value;
import org.springframework.security.core.Authentication;
import org.springframework.security.web.authentication.SimpleUrlAuthenticationSuccessHandler;
import org.springframework.stereotype.Component;

import java.io.IOException;

/**
 * OAuth2 로그인 성공시 토큰 생성
 *
 */
@Component
@Log4j2
@RequiredArgsConstructor
public class OAuth2SuccessHandler extends SimpleUrlAuthenticationSuccessHandler {

    private final JwtTokenProviderService jwtTokenProviderService;

    @Value("${serverRedirectFrontUrl}")
    private  String serverRedirectFrontUrl ;


    @Override
    public void onAuthenticationSuccess(HttpServletRequest request, HttpServletResponse response, Authentication authentication)
            throws IOException, ServletException {
        TokenDto tokenDto= jwtTokenProviderService.create(authentication);
        String redUrlPath=serverRedirectFrontUrl+"/sociallogin?accessToken=" +tokenDto.getAccessToken()
                +"&refreshToken="+tokenDto.getRefreshToken();
        response.sendRedirect(redUrlPath);
    }


}
RedirectUrlCookieFilter 로 redirect 값을 쿠키에 저장해서 개발할경우
nginx 연동 운영서버에서는 에러가 나니 주의
다음과 같이 RedirectUrlCookieFilter 을 생성후
package com.shop.config.filter;

import jakarta.servlet.FilterChain;
import jakarta.servlet.ServletException;
import jakarta.servlet.http.Cookie;
import jakarta.servlet.http.HttpServletRequest;
import jakarta.servlet.http.HttpServletResponse;
import lombok.extern.log4j.Log4j2;
import org.springframework.stereotype.Component;
import org.springframework.web.filter.OncePerRequestFilter;

import java.io.IOException;

@Log4j2
@Component
public class RedirectUrlCookieFilter extends OncePerRequestFilter {

    public static final String REDIRECT_URI_PARAM = "redirect_url";
    private static final int MAX_AGE =180;

    @Override
    protected void doFilterInternal(HttpServletRequest request, HttpServletResponse response,
                                    FilterChain filterChain) throws ServletException, IOException {
        if(request.getRequestURI().startsWith("/api/auth/authorize")){
            try{
                log.info("*** RedirectUrlCookieFilter url {}", request.getRequestURI());
                //프론트엔드에서 전송한 리퀘스트 파라미터에서 redirect_url 을 가져온다.
                String redirectUrl = request.getParameter(REDIRECT_URI_PARAM);

                Cookie cookie = new Cookie(REDIRECT_URI_PARAM, redirectUrl);
                cookie.setPath("/");
                cookie.setHttpOnly(true);
                cookie.setMaxAge(MAX_AGE);
            }catch(Exception ex){
                log.error("Could not set user authentication in security context  :", ex);
                log.info("unauthorized request");
            }
        }
        filterChain.doFilter(request, response);
    }

}
OAuth2SuccessHandler 설정 하면 로컬에서 는 정상적으로 작동되나
nginx 로 실제 운영시에는 redirect_uri 값을 가져오지 못한다.
따라서. propertis 설정으로 할것.
@Component
@Log4j2
@RequiredArgsConstructor
public class OAuth2SuccessHandler extends SimpleUrlAuthenticationSuccessHandler {

     private static final String LOCAL_REDIRECT_URL = "http://localhost:3000";

    @Override
    public void onAuthenticationSuccess(HttpServletRequest request, HttpServletResponse response, Authentication authentication) throws IOException, ServletException {

        TokenDto tokenDto= jwtTokenProviderService.create(authentication);
        // response.getWriter().write(tokenDto.toString());
        String redUrlPath="/sociallogin?accessToken=" +tokenDto.getAccessToken() +"&refreshToken="+tokenDto.getRefreshToken();
        //response.sendRedirect("http://localhost:3000"+redUrlPath);

        //RedirectUrlCookieFilter 에서 리다렉트시에 쿠키에 저장한 redirectUrl 값 가져오기
        Optional<Cookie> optionalCookie =
                Arrays.stream(request.getCookies()).filter(cookie -> cookie.getName().equals(REDIRECT_URI_PARAM)).findFirst();
        Optional<String> redirectUrl = optionalCookie.map(Cookie::getValue);

        log.info(" 쿠키값 redirectUrl   저장 : {} ", redirectUrl);
        response.sendRedirect(  redirectUrl.orElseGet(()->LOCAL_REDIRECT_URL)+redUrlPath);
    }


}
7. 리액트 프론트엔드 구현
Sociallogin
import { Navigate } from "react-router-dom";

const Sociallogin = (props) => {

  const getUrlParameters=(name)=>{
            let search=window.location.search;
            let params=new URLSearchParams(search);
            return params.get(name);
  };


  const accessToken=getUrlParameters('accessToken');
  const refreshToken=getUrlParameters('refreshToken');
  console.log("토큰 파싱 :"+ accessToken, refreshToken);

  if(accessToken && refreshToken){
        console.log("로컬스토리지에 저장 accessToken:", accessToken);
        console.log("로컬스토리지에 저장 refreshToken:", refreshToken);
        localStorage.setItem("ACCESS_TOKEN", accessToken);
        localStorage.setItem("REFRESH_TOKEN",refreshToken);
        return (  <Navigate to={{pathname:'/',  state:{from: props.location}}} /> )

  }else{
        return (<Navigate to={{pathname:'/login',  state:{from: props.location}}} />)
  }

}

export default Sociallogin
ApiServie.js
//oauth2 로그인
export function socialLogin(provider){
    let frontedUrl;
    const hostname =window && window.location && window.location.hostname;
    if(hostname==="localhost"){
        frontedUrl="http://localhost:3000";
    }else{
        frontedUrl="https://ma7front.p-e.kr";
    }
    window.location.href=API_BASE_URL+"/api/auth/authorize/"+provider +"?redirect_url="+frontedUrl;
}


댓글 ( 0)
댓글 남기기