소스 : https://github.com/braverokmc79/react-next-practice
next 프로젝트 생성
npx create-next-app next-practice
Quick source viewer
https://chrome.google.com/webstore/detail/quick-source-viewer/cfmcghennfbpmhemnnfjhkdmnbidpanb?hl=ko
json 더미 데이터 사이트
https://jsonplaceholder.typicode.com/

next.config.js
/** @type {import('next').NextConfig} */
const nextConfig = {
  reactStrictMode: false,
  //swcMinify: false,
  images: {
    domains: ["via.placeholder.com"],
    path: ''
  }
}

module.exports = nextConfig
1.pages
1) _app.js
import Layout from '../components/Layout'
import '../styles/globals.css'

function MyApp({ Component, pageProps }) {
  return (
    <Layout>
      <Component {...pageProps} />
    </Layout>
  )
}

export default MyApp
2)index.js
export default function Home({ posts }) {

  return (
    <div>
      <h1>Welcome to My Home </h1>
      <ul>
        {posts.map(post => (
          <li key={post.id}>{post.title}</li>
        ))}
      </ul>
    </div >
  )
}

let URL = "https://jsonplaceholder.typicode.com/posts?_start=0&_end=10";
//URL = "http://localhost:8080/api/post";


//SSR : Server Side Rendering  : 요청이 올 때 마다 해당하는 HTML 문서를 그때 그때 생성하여 반환한다.
// export const getServerSideProps = async () => {
//   const posts = await fetch(URL).then(res => res.json()).then(data => data)

//   return {
//     props: {
//       posts
//     }
//   }
// }

export const getStaticProps = async () => {
  const posts = await fetch(URL).then(res => res.json()).then(data => data)

  return {
    props: {
      posts
    },
    //처음 접속한 후 20초지난 시점부터 언제든지 접속이 일어나면 파일을 새롭게 생성
    revalidate: 20
  }
}
3)photos.js
/* eslint-disable @next/next/no-img-element */
import React from 'react'
import { Head } from 'next/head';
import HeadInfo from './../components/HeadInfo';
import Image from 'next/image';
import photosStyles from "../styles/Photos.module.css"
import Link from 'next/link';

function photos({ photos }) {
    console.log("photos : ", photos);
    return (
        <>
            <HeadInfo title="my Blog Pohtos" />
            <div>
                <h1>Welcome to My photos </h1>
                <ul className={photosStyles.photos}>

                    {photos.map(photo => (

                        <li key={photo.id}>

                            <Link href={`/photos/${photo.id}`} >
                                <a>
                                    <img
                                        src={photo.thumbnailUrl}
                                        width={100}
                                        height={100}
                                        alt={photo.title}
                                    />
                                    <span>{photo.title}</span>
                                </a>
                            </Link>

                        </li>
                    ))}

                </ul>


            </div>
        </>
    )
}

let URL = "https://jsonplaceholder.typicode.com/photos?_start=0&_end=10";

export const getStaticProps = async () => {
    const photos = await fetch(URL).then(res => res.json()).then(data => data);
    return {
        props: {
            photos
        },
        revalidate: 20
    }
}

export default photos;
4)pages/photos/[id]/index.js
import Link from 'next/link'
import React from 'react'
import { Image } from 'next/image';
import { useRouter } from 'next/router';


const index = ({ photo }) => {
    // eslint-disable-next-line react-hooks/rules-of-hooks
    const router = useRouter();
    const id = router.query;
    console.log("router   : ", router, id);
    console.log("id   : ", id);

    const { title, url } = photo;

    return (
        <div>
            <h2>{title}</h2>

            <img
                src={url}
                widht={500} height={500}
            />
            <Link href="/photos" >
                <a>go back</a>
            </Link>
        </div>
    )
}


export const getStaticProps = async (context) => {

    const { id } = context.params;
    const photo = await fetch(`https://jsonplaceholder.typicode.com/photos/${id}`).then(res => res.json()).then(data => data);
    return {
        props: {
            photo
        },
        revalidate: 10
    }
}

export const getStaticPaths = async () => {
    const photos = await fetch("https://jsonplaceholder.typicode.com/photos?_start=0&_end=10").then(res => res.json()).then(data => data);
    const ids = photos.map(photo => photo.id);
    const paths = ids.map(id => {
        return {
            params: { id: id.toString() }
        }
    })

    return {
        paths,
        fallback: false
    }

    // return {
    //     paths: [
    //         {
    //             params: { id: '1' }
    //         },
    //         {
    //             params: { id: '2' }
    //         },
    //         {
    //             params: { id: '3' }
    //         }
    //     ],
    //     fallback: false
    // }
}


export default index
2.components
1)HeadInfo.js
import Head from 'next/head'
import React from 'react'

const HeadInfo = ({ title, keyword, contents }) => {
    return (
        <Head>
            <title>{title}</title>
            <meta keyword={keyword} />
            <meta content={contents} />
        </Head>
    )
}
HeadInfo.defaultProps = {
    title: 'My Blog',
    keyword: 'Blog powered by Next js',
    content: 'practice next js'
}

export default HeadInfo
2)Nav.js
import Link from 'next/link'
import React from 'react'
import navStyles from '../styles/Nav.module.css'


const Nav = () => {
    return (
        <nav className={navStyles.nav}>
            <ul>
                <li>
                    <Link href="/">
                        Home
                    </Link>
                </li>
                <li>
                    <Link href="/photos">
                        photos
                    </Link>
                </li>
            </ul>
        </nav>
    )
}

export default Nav
3)Layout.js
import Head from 'next/head'
import React from 'react'
import HeadInfo from './HeadInfo'
import Nav from './Nav'

const Layout = ({ children }) => {
    return (
        <>
            <HeadInfo />
            <Nav />
            <div>
                {children}
            </div>
        </>
    )
}

export default Layout
3.styles
1)Nav.module.css
.nav{
    padding: 0.5rem 1rem;
    background: #2c82c9;
}
.nav ul{
    display: flex;
}

.nav li{
   margin-left: 1rem;
   color:#fff;
}
2)Photos.module.css
.photos{
    display: grid;
    grid-template-columns:repeat(4, 1fr) ;
    grid-gap: 1rem;
}

.photos li{
    display: flex;
    flex-direction: column;
}
■ vercel 배포


https://react-next-practice-ten.vercel.app/
Node

app.js
const express = require('express');
const cors = require('cors');
const app = express();
const PORT = 8080;
const { posts } = require('./data.js')

app.use(cors());
app.get('/api/post', (req, res) => {
    console.log("cors no");
    res.json(posts);
})


app.listen(PORT, () => console.log(`server running on ${PORT}`));
express , cors , nodemon 설치
$ yarn add express cors
$ npm install --save-dev nodemon
scripts "backend": "nodemon app.js", nodemon 설정
package.json
{
  "dependencies": {
    "cors": "^2.8.5",
    "express": "^4.18.1"
  },
  "devDependencies": {
    "nodemon": "^2.0.20"
  },
  "scripts": {
    "start": "node app.js",
    "backend": "nodemon app.js",
    "test": "echo \"Error: no test specified\" && exit 1"
  }
}
[Next.js] Vercel로 프론트 배포하기
2022. 1. 8. 20:56
Vercel 은 Next.js 에서 제공하는 배포플랫폼으로 [빌드 + 배포 + 호스팅] 서비스를 제공한다.
Next.js 공식문서에서는 Vercel를 통한 Front Project 배포를 권장하고 있으며, github의 레파지토리를 통해 쉽게 배포 할 수 있다.
Vercel 에서의 배포를 위해 pakage.json 에 deploy를 추가한다.
{
  "scripts": {
    "dev": "next dev",
    "build": "next build",
    "start": "next start"
  }
}
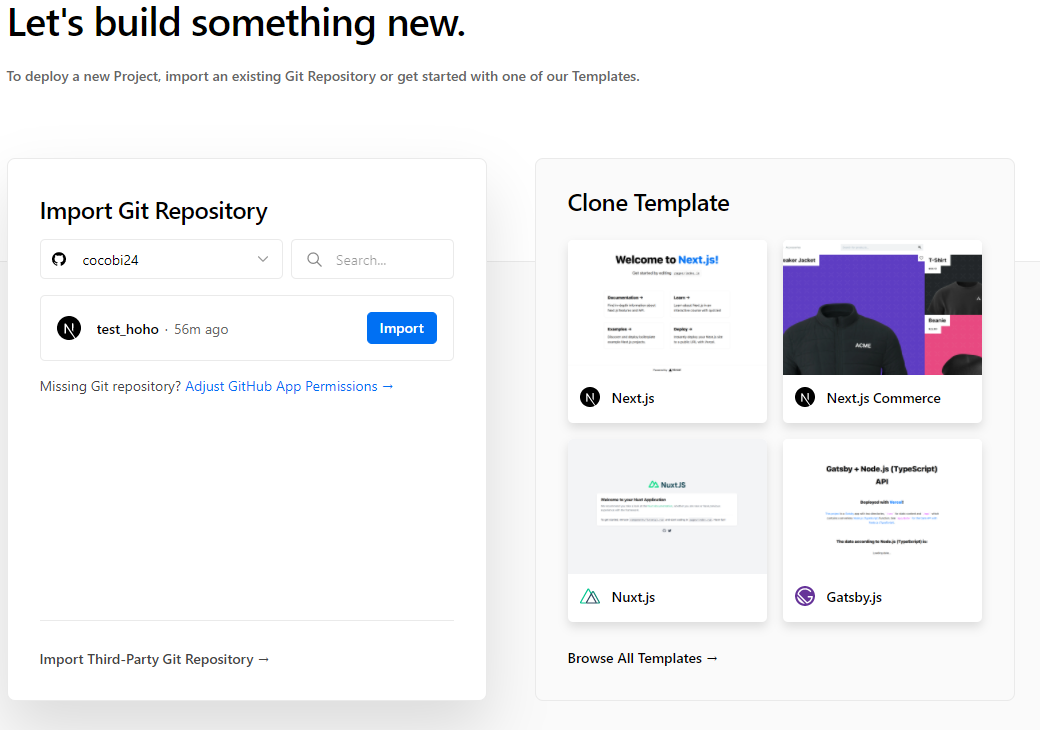
https://vercel.com/new 에서 github 계정으로 로그인 후 배포 할 repository를 등록하고 import project 를 클릭한다
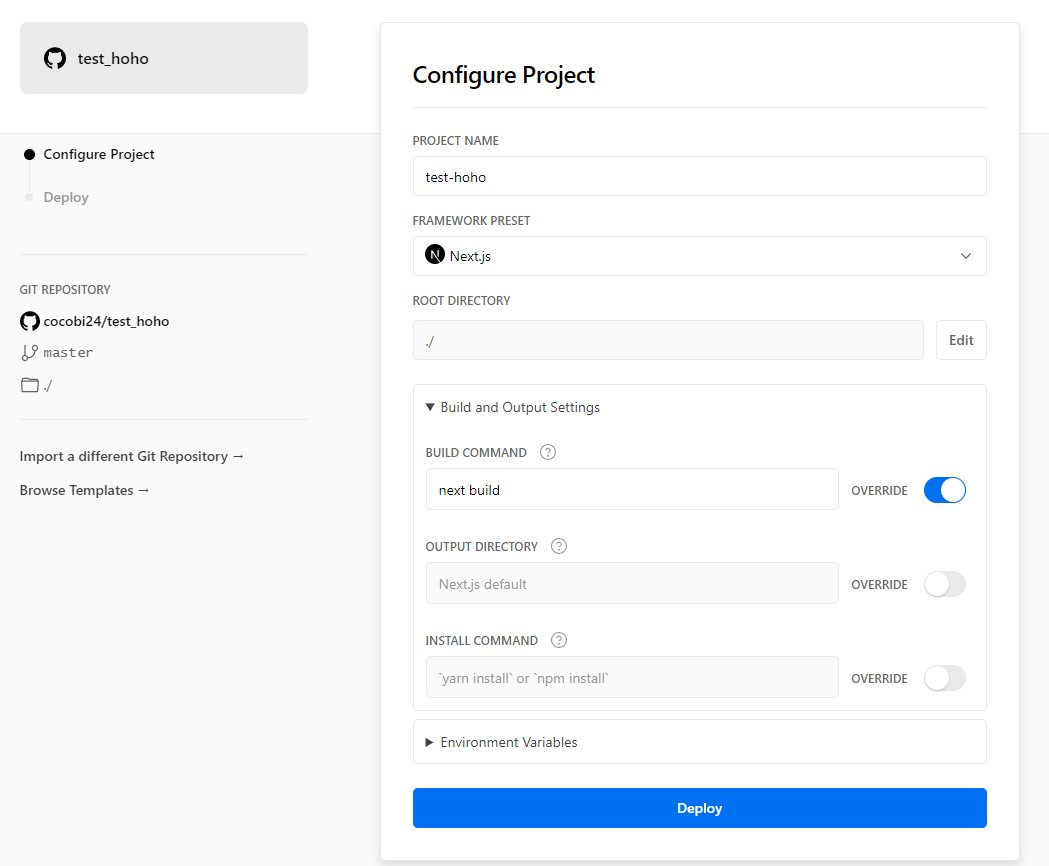
프로젝트 빌드를 위한 설정을 하는 단계이다.
BUILD COMMAND 에 pakage.json 에서 추가한 Build 명령어를 입력한다.
OUTPUT DIRECTORY 은 배포시 디렉토리의 경로이다. Vercel이 프로젝트가 출력되면 자동으로 디렉토리가 구성된다.
INSTALL COMMAND 는 빌드단계에서 package-lock.json 이 있으면 Vercel이 install 명령어를 실행하여 dependencies를 설치해준다.
환경변수가 필요하다면 Environment Variables에서 설정할 수 있고 Deploy 를 실행한다.
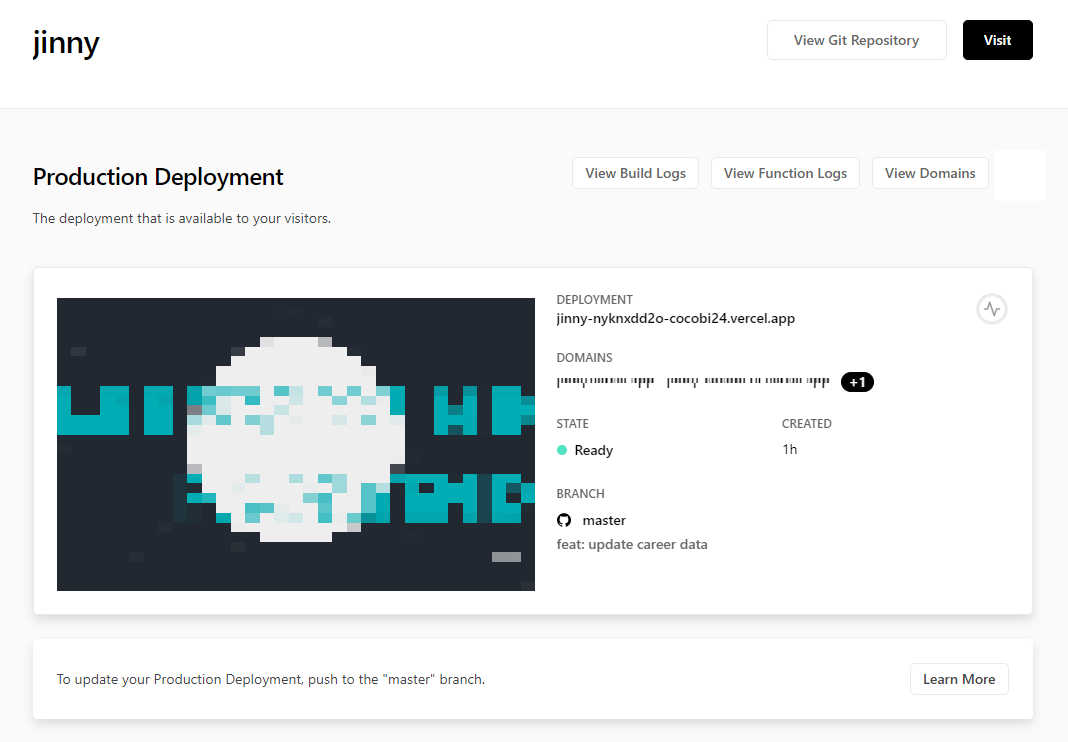
배포를 성공하면 아래와 같이 나온다.
또한, 단순한 배포 외에도 Deployment Status를 확인하거나, Analytics 등 많은 기능을 이용할 수 있다.
※ 참고문서
https://nextjs.org/docs/deployment#managed-nextjs-with-vercel


댓글 ( 4)
댓글 남기기