292
No
변경사항

class ProductDAO
추가 update , delete
   public void update(ProductDTO dto){
        SQLiteDatabase db =null;
        try{
            db=dbConn();
         //String.format("출력형식", 출력할 값들)
         // %s 스트링, %d 숫자값
            String sql=String.format(
                    " update product set product_name ='%s' , price =%d ," +
                            " amount =%d " +
                            " where id=%d", dto.getProduct_name(), dto.getPrice()
                    , dto.getAmount(), dto.getId());
                    db.execSQL(sql); //SQL 실행(select 제외)
        }catch (Exception e){
                e.printStackTrace();
        }finally {
            if(db!=null) db.close(); // DB 닫기
        }
    }


    public void delete(int id){
        SQLiteDatabase db=null;
        try{
            db=dbConn();
            String sql =" delete from product where id="+id;
            db.execSQL(sql);
        }catch (Exception e){
            e.printStackTrace();
        }finally {
            if(db!=null)db.close();
        }
    }
package com.example.choi.ex03_db.dao;

import android.content.Context;
import android.database.Cursor;
import android.database.sqlite.SQLiteDatabase;
import android.util.Log;

import com.example.choi.ex03_db.dto.ProductDTO;

import java.util.ArrayList;
import java.util.List;

/**
 * Created by choi on 2017-02-11.
 */

// Context :  문맥, 흐름, 현재 실행중인 화면
public class ProductDAO {

    Context context;
    SQLiteDatabase db;

    //Context context =activity
    public ProductDAO(Context context){
        this.context=context;
    }

//  Context.MODE_PRIVATE : 단독 사용 모드
    public SQLiteDatabase dbConn(){
        //데이터베이스를 오픈하거나 생성
        db=context.openOrCreateDatabase("product.db", Context.MODE_PRIVATE, null);

        //테이블이 존재하지 않으면  create
        // 자동증가컬럼은 자료형을 integer 로 하고 primary key 로 설정
        Log.v("메시지",  "dbConn() start");
        try{

            String sql ="create table if not exists product (" +
                    " id integer primary key autoincrement , " +
                    " product_name varchar(50) not null , " +
                    " price int  not null ," +
                    " amount int not null )";
            db.execSQL(sql);  // select 이외의 쿼리

        }catch (Exception e){
            e.printStackTrace();
            Log.v("메시지",  "dbConn() execSQL : " + e.getMessage());
        }

        return db;
    }

    public void insert(ProductDTO dto){
        SQLiteDatabase db=null;
        try{

            db =dbConn();
            Log.v("메시지",  "insert() start");
            String sql =String.format(" insert into product " +
                    " ( product_name , price, amount ) values " +
                    " ('%s' , %d, %d ) ", dto.getProduct_name(), dto.getPrice(), dto.getAmount() );
            db.execSQL(sql); // select  이외의 쿼리 실행
        }catch (Exception e){
            Log.v("메시지",  "error :" + e.getMessage());
            e.printStackTrace();
        }finally {
            if(db!=null) db.close(); //db 닫기
        }
    }


    public List<ProductDTO> list(){

        List<ProductDTO>  items =new ArrayList<>();
        SQLiteDatabase db =null;
        Cursor cursor =null; //결과셋, 레코드셋

        try{

            db =dbConn();
            // select * from product 로 * 를 쓰지말고 컬럼이름을 나열 해야 한다.
            // 왜냐 하면 cursor.getInt(0); 컬럼 이름은 사용할 수 없음 때문이다.
            String sql =" select id, product_name , price, amount" +
                    " from product order by product_name " ;

            // select 쿼리를 실행하여 결과셋을 커서에 리턴함
            // execSQL()  - select  이외의 쿼리
            // rawQuery() - select 쿼리 전용
            // rawQuery(sql , null) - null 자리에 조건 검색 을 쓰면 된다.
            // 그러나 쿼리에 조건절을 써도 된다.
            cursor =db.rawQuery(sql, null);
            //커서.moveToNext() 다음 레코드가 존재하면 true 리턴
            while(cursor.moveToNext()){
            //커서.get자료형(컬럼의 인텍스) 0 부터, 컬럼 이름은 사용할 수 없음
                int id =cursor.getInt(0);
                String product_name =cursor.getString(1);
                int price=cursor.getInt(2);
                int amount=cursor.getInt(3);
                items.add(new ProductDTO(id, product_name, price, amount));

            }

        }catch (Exception e){
            e.printStackTrace();
        }finally {
            if(cursor!=null) cursor.close();
            if(db !=null)db.close();
        }
        return items;
    }


    public void update(ProductDTO dto){
        SQLiteDatabase db =null;
        try{
            db=dbConn();
         //String.format("출력형식", 출력할 값들)
         // %s 스트링, %d 숫자값
            String sql=String.format(
                    " update product set product_name ='%s' , price =%d ," +
                            " amount =%d " +
                            " where id=%d", dto.getProduct_name(), dto.getPrice()
                    , dto.getAmount(), dto.getId());
                    db.execSQL(sql); //SQL 실행(select 제외)
        }catch (Exception e){
                e.printStackTrace();
        }finally {
            if(db!=null) db.close(); // DB 닫기
        }
    }


    public void delete(int id){
        SQLiteDatabase db=null;
        try{
            db=dbConn();
            String sql =" delete from product where id="+id;
            db.execSQL(sql);
        }catch (Exception e){
            e.printStackTrace();
        }finally {
            if(db!=null)db.close();
        }
    }


}
class
ProductDTO
// 객체직렬화를 위해 Serializable 구현
intent 에서 putExtra 로 DTO 객체를 담기위해서는
implements Serializable 추가
직렬화란?
객체의 직렬화는 객체의 내용을 바이트 단위로 변환하여 파일 또는 네트워크를 통해서 스트림(송수신)이 가능하게 하는것을 의미한다.
| 자바 I/O 처리는 정수, 문자열, 바이트 단위의 처리만 지원했었다.따라서 복잡한 객체의 내용을 저장/복원하거나, 네트워크로 전송하기 위해서는 객체의 멤버변수의 각 내용을 일정한 형식으로 만들어(이것을 패킷이라고 한다) 전송해야 했다.
객체직렬화는 객체의 내용(구체적으로는 멤버변수의 내용)을 자바 I/O가 자동적으로 바이트 단위로 변환하여, 저장/복원하거나 네트워크로 전송할 수 있도록 기능을 제공해준다. 즉, 개발자 입장에서는 객체가 아무리 복잡하더라도, 객체직렬화를 이용하면 객체의 내용을 자바 I/O가 자동으로 바이트 단위로 변환하여 저장이나 전송을 해주게 된다. 또한 이것은 자바에서 자동으로 처리해주는 것이기 때문에, 운영체제가 달라도 전혀 문제되지 않는다. |
// 객체직렬화를 위해 Serializable 구현
public class ProductDTO implements Serializable {
class ProductAcitivity
          //현재 자식뷰에 출력시킬 데이터

       //익명 내부 클래스에서 사용하기 위해 final 변경

            final ProductDTO dto =items.get(position);


            //자식뷰에 터치 이벤트 추가
            v.setOnClickListener(new View.OnClickListener() {
                @Override
                public void onClick(View v) {
                    //화면전화
                    Intent intent=new Intent(ProductAcitivity.this, ProductEditActivity.class);
                    //putExtra("변수명", 값) 객체를 넘길 경우 Serializable 을 구현해야 함.
                    intent.putExtra("dto", dto);
//                    intent.putExtra("id", dto.getId());
//                    intent.putExtra("product_name", dto.getProduct_name());
//                    intent.putExtra("price", dto.getPrice());
//                    intent.putExtra("amount", dto.getAmount());
                    startActivity(intent);

                }
            });


/*            v.setOnTouchListener(new View.OnTouchListener(){
                @Override
                public boolean onTouch(View v, MotionEvent event) {
                    return false;
                }
            });*/
            return v;
package com.example.choi.ex03_db;
import android.content.Context;
import android.content.Intent;
import android.os.Bundle;
import android.support.annotation.NonNull;
import android.support.v7.app.AppCompatActivity;
import android.util.Log;
import android.view.LayoutInflater;
import android.view.View;
import android.view.ViewGroup;
import android.widget.ArrayAdapter;
import android.widget.Button;
import android.widget.ListView;
import android.widget.TextView;
import com.example.choi.ex03_db.dao.ProductDAO;
import com.example.choi.ex03_db.dto.ProductDTO;
import java.util.List;
public class ProductAcitivity extends AppCompatActivity {
//1.변수 선언
Button btnAdd;
ListView list;
ProductDAO dao;
List<ProductDTO> items;
//화면 생성될 때 호출
@Override
protected void onCreate(Bundle savedInstanceState) {
super.onCreate(savedInstanceState);
setContentView(R.layout.product_acitivity);
//2.객체 생성
btnAdd=(Button)findViewById(R.id.btnAdd);
list=(ListView)findViewById(R.id.list);
dao=new ProductDAO(this);
//3.이벤트 처리
btnAdd.setOnClickListener(new View.OnClickListener() {
@Override
public void onClick(View v) {
Intent intent=new Intent(ProductAcitivity.this, ProductAddActivity.class);
startActivity(intent);
}
});
}
// onCreate() => onStart() => onResume()
// 화면생성 화면시작전 화면재시작 - onResume 항상 호출된다.
@Override
protected void onResume() {
super.onResume(); //지우면 안된다.
items=dao.list();
// Log.옵션("태그 " , " 출력할 내용" )
Log.i("test" , "상품목록 : " + items);
/*
String[] product_name =new String[items.size()];
for(int i=0; i<product_name.length; i++){
product_name[i]=items.get(i).getProduct_name();
}
ArrayAdapter adapter=new ArrayAdapter(this,
android.R.layout.simple_list_item_1, product_name);
*/
// 데이터 => 아답터 => 뷰
MyAdapter adapter =new MyAdapter(this, R.layout.product_row, items);
list.setAdapter(adapter);
}
//커스텀 아답터(내부 클래스)
class MyAdapter extends ArrayAdapter<ProductDTO>{
//생성자 (Constructor)
public MyAdapter(Context context, int resource, List<ProductDTO> objects) {
super(context, resource, objects);
}
/*
attachToRoot 팽창 된 계층을 첨부할지 어떨지
* 루트 매개 변수? false 인 경우, root는
XML의 루트 뷰에 대한 올바른 LayoutParams 서브 클래스.
* @return 팽창 된 계층 구조의 루트 뷰입니다. 루트가 제공되고
* attachToRoot가 참이면 루트입니다. 그렇지 않으면 그것은 XML 파일.
inflate(XmlPullParser parser, @Nullable ViewGroup root)
inflate(XmlPullParser parser, @Nullable ViewGroup root, boolean attachToRoot)
*/
@NonNull //린턴값은 null 이 될 수 없음
@Override
public View getView(int position, View convertView, ViewGroup parent) {
View v =convertView; //현재 출력할 자식뷰
if(v==null){ //최초 1 개만 생성
//레이아웃 생성기
LayoutInflater li=(LayoutInflater)getLayoutInflater();
v=li.inflate(R.layout.product_row, null);
}
//현재 자식뷰에 출력시킬 데이터
final ProductDTO dto =items.get(position);
//dto의 값을 product_row.xml 위젯에 출력시킴
//컨텍스트.findViewById() 메인뷰의 위젯
//자식뷰.findViewById() 자식뷰의 위젯
TextView txtProductName=(TextView)v.findViewById(R.id.txtProductName);
TextView txtPrice =(TextView)v.findViewById(R.id.txtPrice);
TextView txtAmount=(TextView)v.findViewById(R.id.txtAmount);
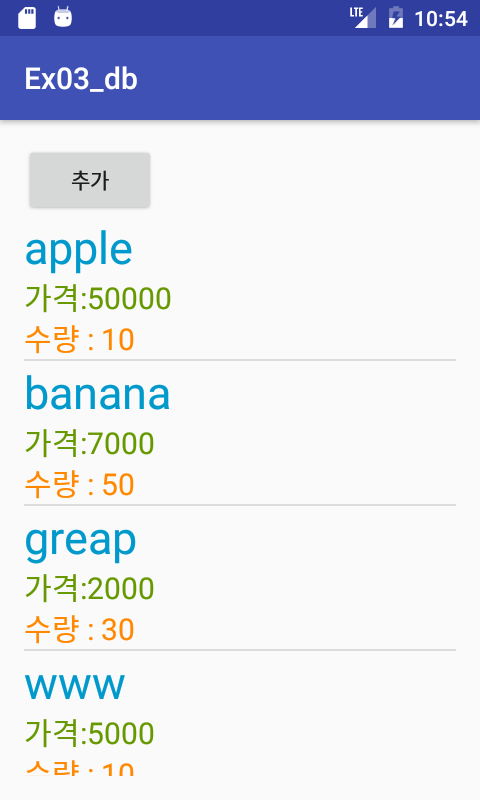
txtProductName.setText(dto.getProduct_name());
txtPrice.setText("가격:"+ dto.getPrice());
txtAmount.setText("수량 : "+dto.getAmount());
//자식뷰에 터치 이벤트 추가
v.setOnClickListener(new View.OnClickListener() {
@Override
public void onClick(View v) {
//화면전화
Intent intent=new Intent(ProductAcitivity.this, ProductEditActivity.class);
//putExtra("변수명", 값) 객체를 넘길 경우 Serializable 을 구현해야 함.
intent.putExtra("dto", dto);
// intent.putExtra("id", dto.getId());
// intent.putExtra("product_name", dto.getProduct_name());
// intent.putExtra("price", dto.getPrice());
// intent.putExtra("amount", dto.getAmount());
startActivity(intent);
}
});
/* v.setOnTouchListener(new View.OnTouchListener(){
@Override
public boolean onTouch(View v, MotionEvent event) {
return false;
}
});*/
return v;
}
}
}
class ProductEditActivity
package com.example.choi.ex03_db;
import android.app.AlertDialog;
import android.content.DialogInterface;
import android.content.Intent;
import android.os.Bundle;
import android.support.v7.app.AppCompatActivity;
import android.view.View;
import android.widget.Button;
import android.widget.EditText;
import android.widget.Toast;
import com.example.choi.ex03_db.dao.ProductDAO;
import com.example.choi.ex03_db.dto.ProductDTO;
public class ProductEditActivity extends AppCompatActivity implements
View.OnClickListener {
//1.변수 선언
EditText editProductName, editPrice, editAmount;
Button btnUpdate, btnDelete;
ProductDTO dto;
ProductDAO dao;
@Override
protected void onCreate(Bundle savedInstanceState) {
super.onCreate(savedInstanceState);
setContentView(R.layout.product_edit);
// 2.객체 생성
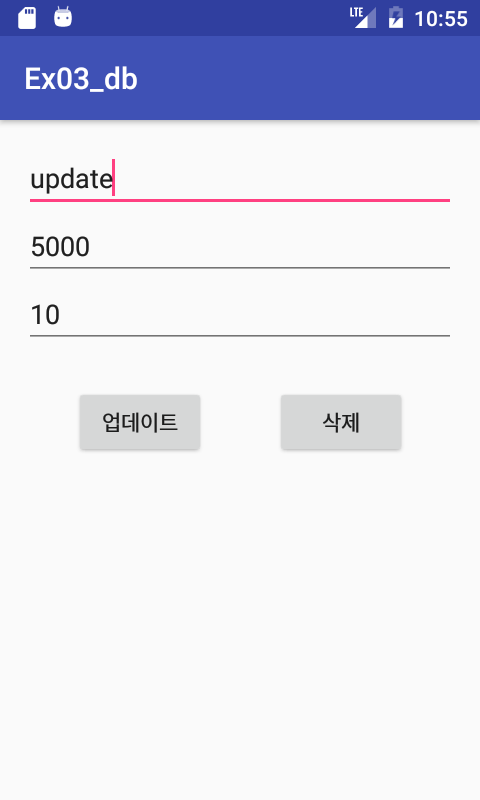
editProductName=(EditText)findViewById(R.id.editProductName);
editPrice=(EditText)findViewById(R.id.editPrice);
editAmount=(EditText)findViewById(R.id.editAmount);
btnUpdate=(Button)findViewById(R.id.btnUpdate);
btnDelete=(Button)findViewById(R.id.btnDelete);
dao=new ProductDAO(this);
//3.인텐트 정보 수신
Intent intent=getIntent();
dto=(ProductDTO)intent.getSerializableExtra("dto");
editProductName.setText(dto.getProduct_name());
//EditText 에는 스트링만 입력 가능함, 숫자값을 넣으면 에러 발생
editPrice.setText(Integer.toString(dto.getPrice()));
editAmount.setText(dto.getAmount()+"");
//4.이벤트 처리
// this => 현재 클래스가 이벤트핸들러
// 수정, 삭제 버튼을 클릭하면 현재 클래스의 onClick() 이 호출됨.
btnDelete.setOnClickListener(this);
btnUpdate.setOnClickListener(this);
}
//Alt + Insert => Implement method
// 수정, 삭제 버튼을 클릭하면 View v 에 버튼의 정보가 전달됨.
@Override
public void onClick(View v) {
switch (v.getId()){ //클릭한 버튼의 아이디값
case R.id.btnUpdate:
String product_name=editProductName.getText().toString();
int price=Integer.parseInt(editPrice.getText().toString());
int amount =Integer.parseInt(editAmount.getText().toString());
//아이디 값은 화면 전환시 인텐트 정보 수신 dto 에 저장 되어 있다.
dto.setProduct_name(product_name);
dto.setPrice(price);
dto.setAmount(amount);
dao.update(dto);
Toast.makeText(ProductEditActivity.this, "수정 되었습니다.",
Toast.LENGTH_SHORT).show();
finish();
break;
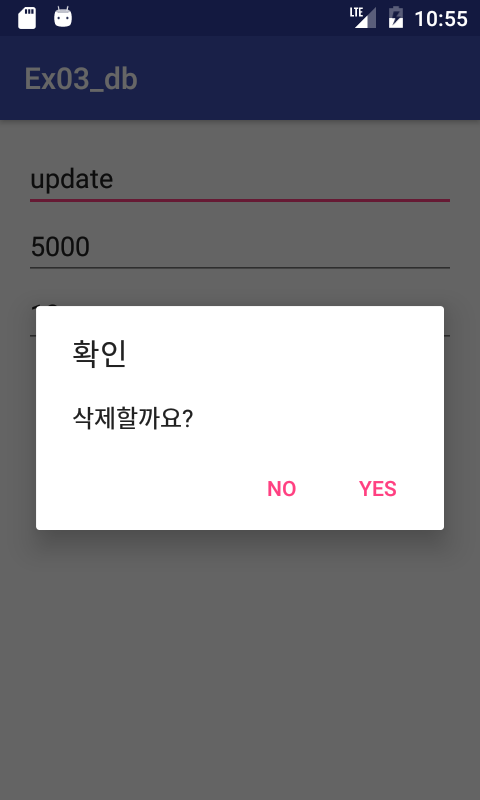
case R.id.btnDelete:
dao.delete(dto.getId());
//다이얼로그 생성
//new AlertDialog.Builder(컨텍스트)
// alt+enter => import
// setPositiveButton("라벨", 이벤트핸들러) 확인 버튼 (오른쪽)
// setNutralButton("라벨", 이벤트핸들러) 가운데
// setNegativeButton("라벨", 이벤트핸들러) 왼쪽 버튼 (왼쪽)
new AlertDialog.Builder(this)
.setTitle("확인")
.setMessage("삭제할까요?")
.setPositiveButton("Yes", new DialogInterface.OnClickListener() {
@Override
public void onClick(DialogInterface dialog, int which) {
Toast.makeText(ProductEditActivity.this, "삭제 되었습니다.", Toast.LENGTH_SHORT).show();
finish();//현재 화면 종료
}
})
.setNegativeButton("No", null)
.show();
break;
}
}
}
product_edit.xml
<?xml version="1.0" encoding="utf-8"?>
<RelativeLayout xmlns:android="http://schemas.android.com/apk/res/android"
    xmlns:tools="http://schemas.android.com/tools"
    android:id="@+id/product_edit"
    android:layout_width="match_parent"
    android:layout_height="match_parent"
    android:paddingBottom="@dimen/activity_vertical_margin"
    android:paddingLeft="@dimen/activity_horizontal_margin"
    android:paddingRight="@dimen/activity_horizontal_margin"
    android:paddingTop="@dimen/activity_vertical_margin"
    tools:context="com.example.choi.ex03_db.ProductEditActivity">

    <EditText
        android:layout_width="match_parent"
        android:layout_height="wrap_content"
        android:inputType="textPersonName"
        android:ems="10"
        android:id="@+id/editProductName"
        tools:text="상품이름을 입력하세요" />

    <EditText
        android:layout_width="match_parent"
        android:layout_height="wrap_content"
        android:inputType="number"
        android:ems="10"
        android:layout_below="@+id/editProductName"
        android:layout_alignParentLeft="true"
        android:layout_alignParentStart="true"
        android:id="@+id/editPrice"
        tools:text="가격을 입력하세요" />

    <EditText
        android:layout_width="match_parent"
        android:layout_height="wrap_content"
        android:inputType="textPersonName"
        android:ems="10"
        android:id="@+id/editAmount"
        android:layout_below="@+id/editPrice"
        android:layout_alignParentLeft="true"
        android:layout_alignParentStart="true"
        tools:text="수량을 입력하세요" />

    <Button
        android:text="업데이트"
        android:layout_width="wrap_content"
        android:layout_height="wrap_content"
        android:layout_below="@+id/editAmount"
        android:layout_alignParentLeft="true"
        android:layout_alignParentStart="true"
        android:layout_marginLeft="33dp"
        android:layout_marginStart="33dp"
        android:layout_marginTop="25dp"
        android:id="@+id/btnUpdate" />

    <Button
        android:text="삭제"
        android:layout_width="wrap_content"
        android:layout_height="wrap_content"
        android:layout_alignTop="@+id/btnUpdate"
        android:layout_toRightOf="@+id/btnUpdate"
        android:layout_toEndOf="@+id/btnUpdate"
        android:layout_marginLeft="46dp"
        android:layout_marginStart="46dp"
        android:id="@+id/btnDelete" />

</RelativeLayout>


댓글 ( 4)
댓글 남기기