수강하기 ---> 처음 만난 리액트(React)


강의를 책으로도 볼 수 있도록
강의 내용을 고스란히 책에 담았습니다.
동영상 강의와 함께 책을 보면서
리액트의 세계로 빠져보세요!
소문난 명강의
소플의 처음 만난 리액트
- 리액트 기초 개념 정리부터 실습까지
vscode 확장 패키지 추가
1. - Auto Import - ES6, TS, JSX, TSX
2. - Reactjs code snippets
3. - ESLint
4. - Prettier - Code formatter
Visual Studio Code 폴더/파일 아이콘 변경하기
리액트 프로젝트 생성
npx create-react-app 경로
예) npx create-react-app E:\react-app2
npx create-react-app my-app
#애플리케이션 실행
실행 : npm start
13. Styling
styled-components 설치
# npm 을 사용하는 경우
npm install --save styled-components
#yarn을 사용하는 경우
yarn add styled-components
공식문서 : https://styled-components.com/docs/basics#getting-started
Styled Components로 React 컴포넌트 스타일하기 =>
https://www.daleseo.com/react-styled-components/
기본 문법
먼저 위에서 설치한 styled-components 패키지에서 styled 함수를 임포트합니다. styled는 Styled Components의 근간이 되는 가장 중요한 녀석인데요. HTML 엘리먼트나 React 컴포넌트에 원하는 스타일을 적용하기 위해서 사용됩니다.
기본 문법은 HTML 엘리먼트나 React 컴포넌트 중 어떤 것을 스타일링 하느냐에 따라 살짝 다릅니다.
- HTML 엘리먼트를 스타일링 할 때는 모든 알려진 HTML 태그에 대해서 이미 속성이 정의되어 있기 때문에 해당 태그명의 속성에 접근합니다.
import styled from "styled-components";

styled.button`
  // <button> HTML 엘리먼트에 대한 스타일 정의
`;
- React 컴포넌트를 스타일링 할 때는 해당 컴포넌트를 임포트 후 인자로 해당 컴포넌트를 넘기면 됩니다.
import styled from "styled-components";
import Button from "./Button";

styled(Button)`
  // <Button> React 컴포넌트에 스타일 정의
`;
두가지 문법 모두 ES6의 Tagged Template Literals을 사용해서 스타일을 정의합니다. 그리고 styled 함수는 결국 해당 스타일이 적용된 HTML 엘리먼트나 React 컴포넌트를 리턴합니다.
예를 들어, 다음과 같이 Styled Components로 작성된 JavaScript 코드는
import styled from "styled-components";

styled.button`
  font-size: 1rem;
`;
아래 CSS 코드가 적용된 <button> HTML 엘리먼트를 만들어낸다고 생각하면 쉽습니다.
button {
  font-size: 1rem;
}
이런 식으로 Styled Components를 이용해서 JavaScript 코드 안에 삽입된 CSS 코드는 글로벌 네임 스페이스를 사용하지 않습니다. 다시 말해, 각 JavaScript 파일마다 고유한 CSS 네임 스페이스를 부여해주기 때문에, 각 React 컴포넌트에 완전히 격리된 스타일을 적용할 수 있게 됩니다.
이 것은 순수하게 CSS만을 사용했을 때는 누리기 어려웠던 대표적인 CSS in JS의 장점 중 하나 입니다.
가변 스타일링 1
Styled Components는 React 컴포넌트에 넘어온 props에 따라 다른 스타일을 적용하는 기능을 제공합니다. Tagged Template Literals을 사용하기 때문에 함수도 문자열 안에 포함시킬 수 있다는 점을 이용하는데요.
예를 들어, 버튼의 글자색과 배경색을 props따라 바뀌도록 위에서 작성한 예제 코드를 변경해보겠습니다. 자바스크립트의 || 연산자를 사용하여 props이 넘어오지 않은 경우, 기존에 정의한 기본 색상이 그대로 유지되도록 합니다.
import React from "react";
import styled from "styled-components";

const StyledButton = styled.button`
  padding: 6px 12px;
  border-radius: 8px;
  font-size: 1rem;
  line-height: 1.5;
  border: 1px solid lightgray;

  color: ${(props) => props.color || "gray"};
  background: ${(props) => props.background || "white"};
`;

function Button({ children, color, background }) {
  return (
    <StyledButton color={color} background={background} Î>
      {children}
    </StyledButton>
  );
}
여기서 주의할 점은 <Button />에 넘어온, color와 background prop을 <StyledButton/> 컴포넌트로 넘겨줘야 한다는 것입니다. (그러지 않을 경우, <StyledButton/> 컴포넌트가 해당 prop을 인식할리가 없겠죠?)
자, 이제 다음과 같이 버튼을 사용하면 핑크 배경에 초록 글자를 갖도록 스타일된 버튼을 만들 수 있습니다.
import Button from "./Button";
<Button color="green" background="pink">
  Green Button
</Button>;
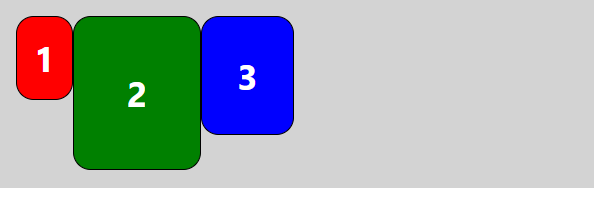
(실습) styled-components를 사용하여 스타일링 해보기
Blocks.jsx
import React from 'react';
import styled from 'styled-components';

const Wrapper = styled.div`
    padding: 1rem;
    display: flex;
    flex-direction:row;
    align-items: flex-start;
    justify-content: flex-start;
    background-color: lightgray;

`;

const Block = styled.div`
    padding: ${(props) => props.padding};
    border: 1px solid black;
    border-radius: 1rem;
    background-color: ${(props) => props.backgroundColor};
    color: white;
    font-size: 2rem;
    font-weight: bold;
    text-align: center;
`;

const blockItems = [
    {
        lable: "1",
        padding: "1rem",
        backgroundColor:"red",
    },
    {
        lable: "2",
        padding: "3rem",
        backgroundColor:"green",
    },
    {
        lable: "3",
        padding: "2rem",
        backgroundColor:"blue",
    },

];

const Blocks = () => {
    return (
        <Wrapper>
            {blockItems.map((blockItem ,index) => {
                return (
                    <Block
                        key={blockItem.lable}
                        padding={blockItem.padding}
                        backgroundColor={blockItem.backgroundColor}
                    >
                        {blockItem.lable}
                  </Block>
                );
            })}
        </Wrapper>
    );
};

export default Blocks;
index.js
import React from 'react';
import ReactDOM from 'react-dom/client';
import './index.css';
import App from './App';
import reportWebVitals from './reportWebVitals';
import Library from './chapter_03/Library';
import Clock from './chapter_04/Clock';
import CommentList from './chapter_05/CommentList';
import NotificationList from './chapter_06/NotificationList';
import Accommodate from './chapter_07/Accommodate';
import ConfirmButton from './chapter_08/ConfirmButton';
import LandingPage from './chapter_09/LandingPage';
import AttendanceBook from './chapter_10/AttendanceBook';
import SignUp from './chapter_11/SignUp';
import Calculator from './chapter_12/Calculator';
import ProfileCard from './chapter_13/ProfileCard';
import DarkOrLight from './chapter_14/DarkOrLight';
import Blocks from './chapter_15/Blocks';

const root = ReactDOM.createRoot(document.getElementById('root'));
root.render(
  <React.StrictMode>
    {/* <App /> */}
    {/* <Library /> */}
    {/* <Clock /> */}
    {/* <CommentList /> */}
    {/* <NotificationList /> */}
    {/* <Accommodate /> */}
    {/* <ConfirmButton /> */}
    {/* <LandingPage /> */}
    {/* <AttendanceBook /> */}
    {/* <SignUp /> */}
    {/* <Calculator /> */}
    {/* <ProfileCard /> */}
    {/* <DarkOrLight /> */}
    <Blocks />
  </React.StrictMode>
);

reportWebVitals();
출력 =>
14. Mini Project
소스 :https://github.com/soaple/mini-blog
1) 미니 블로그 기획, 프로젝트 생성 및 필요한 패키지 설치
미니 블로그에 필요한 기능
·글 목록 보기 기능(리스트 형태)
·글 보기 기능
·댓글 보기 기능
·글 작성 기능
·댓글 작성 기능

create-react-app 을 사용해 프로젝트 생성
$npx create-react-app mini-blog
프로젝트 디렉터리에 들어가서 앱 실행하기
$ cd mini-blog
$ npm start
패키지 설치
react-router-dom v6
styled-components V5
$ yarn add react-router-dom
$ yarn add styled-components
2) 주요 컴포넌트 및 폴더 구성하기


3) UI 컴포넌트 및 List 컴포넌트 구현하기
Button.jsx
import React from 'react';
import { styled } from 'styled-components';

const StyledButton =styled.button`
    padding: 8px 16px;
    font-size: 16px;
    border-width: 1px;
    border-radius:8px;
    cursor: pointer;
`;

const Button = (props) => {
    const { title, onClick } = props;

    return (
        <StyledButton onClick={onClick}>
            {title||"button"}
        </StyledButton>
    );
};

export default Button;
TextInput.jsx
import React from 'react';
import { styled } from 'styled-components';

const StyledTextarea =styled.textarea`
    width : calc(100%-32px);
    ${(props)=>
        props.height&&
    `
        height:${props.height}px;
    `}
    padding: 16px;
    font-size:16px;
    line-height: 20px;
`;

const TextInput = (props) => {
    const { height, value, onChange } = props;
    return (
        <StyledTextarea height={height} value={value} onChange={onChange}>
        </StyledTextarea>
    );

};

export default TextInput;
PostListItem.jsx
import React from 'react';
import { styled } from 'styled-components';

const Wrapper = styled.div`
    width: calc(100% -32px);
    padding: 16px;
    display: flex;
    flex-direction: column;
    align-items: flex-start;
    justify-content: center;
    border: 1px solid grey;
    border-radius: 8px;
    cursor: pointer;
    background: white;
    :hover{
        background: lightgray;
    }
`;

const TitleText = styled.p`
    font-size: 20px;
    font-weight: 500;
`;

const PostListItem = (props) => {
    const { post, onClick } = props;
    return (
        <Wrapper onClick={onClick}>
            <TitleText>{post.title}</TitleText>
        </Wrapper>
    );
};

export default PostListItem;
PostList.jsx
import React from 'react';
import { styled } from 'styled-components';
import PostListItem from './PostListItem';

const Wrapper = styled.div`
    display: flex;
    flex-direction: column;
    align-items: flex-start;
    justify-content: center;
    & >*{
        :not(:last-child){
            margin-bottom: 16px;
        }
    }
`;

const PostList = (props) => {
    const { posts, onClickItem} = props;
    return (
        <Wrapper>
            {posts.map((post, index) => {
                return (
                    <PostListItem
                        key={post.id}
                        post={post}
                        onClick={() => {
                            onClickItem(post);
                        }}
                    />
                );
            })}
        </Wrapper>
    );
};

export default PostList;
CommentListItem.jsx
import React from 'react';
import { styled } from 'styled-components';

const Wrapper = styled.div`
    width: calc(100% -32px);
    padding: 16px;
    display: flex;
    flex-direction: column;
    align-items: flex-start;
    justify-content: center;
    border: 1px solid grey;
    border-radius: 8px;
    cursor: pointer;
    background: white;
    :hover{
        background: lightgray;
    }
`;

const ContentText = styled.p`
    font-size: 20px;
    font-weight: 500;
`;

const CommentListItem = (props) => {
    const { comment } = props;
    return (
        <Wrapper>
            <ContentText>{comment.content}</ContentText>
        </Wrapper>
    );
};

export default CommentListItem;
CommentList.jsx
import React from 'react';
import { styled } from 'styled-components';
import CommentListItem from './CommentListItem';


const Wrapper = styled.div`
    display: flex;
    flex-direction: column;
    align-items: flex-start;
    justify-content: center;
    & >*{
        :not(:last-child){
            margin-bottom: 16px;
        }
    }
`;

const CommentList = (props) => {
    const { comments } = props;

    return (
        <Wrapper>
            {comments.map((comment, index) => {
                return <CommentListItem  key={comment.id}     comment={comment}   /> ;
            })}
        </Wrapper>
    );
};

export default CommentList;
4) 가짜 데이터 만들기
https://raw.githubusercontent.com/soaple/mini-blog/master/src/data.json
5) Page 컴포넌트 구현 및 각 페이지별 경로 구성하기
https://reactrouter.com
MainPage.jsx
import React from "react";
import { useNavigate } from "react-router-dom";
import styled from "styled-components";
import PostList from "../list/PostList";
import Button from "../ui/Button";
import data from '../../data.json';

const Wrapper = styled.div`
    padding: 16px;
    width: calc(100% - 32px);
    display: flex;
    flex-direction: column;
    align-items: center;
    justify-content: center;
`;

const Container = styled.div`
    width: 100%;
    max-width: 720px;
    & > * {
        :not(:last-child) {
            margin-bottom: 16px;
        }
    }
`;

function MainPage(props) {
    const navigate = useNavigate();

    return (
        <Wrapper>
            <Container>
                <Button
                    title="글 작성하기"
                    onClick={() => {
                        navigate("/post-write");
                    }}
                />

                <PostList
                    posts={data}
                    onClickItem={(item) => {
                        navigate(`/post/${item.id}`);
                    }}
                />
            </Container>
        </Wrapper>
    );
}

export default MainPage;
PostWritePage.jsx
import React, { useState } from "react";
import { useNavigate } from "react-router-dom";
import styled from "styled-components";
import TextInput from "../ui/TextInput";
import Button from "../ui/Button";

const Wrapper = styled.div`
    padding: 16px;
    width: calc(100% - 32px);
    display: flex;
    flex-direction: column;
    align-items: center;
    justify-content: center;
`;

const Container = styled.div`
    width: 100%;
    max-width: 720px;
    & > * {
        :not(:last-child) {
            margin-bottom: 16px;
        }
    }
`;

function PostWritePage(props) {
    const navigate = useNavigate();

    const [title, setTitle] = useState("");
    const [content, setContent] = useState("");

    return (
        <Wrapper>
            <Container>
                <TextInput
                    height={20}
                    value={title}
                    onChange={(event) => {
                        setTitle(event.target.value);
                    }}
                />

                <TextInput
                    height={480}
                    value={content}
                    onChange={(event) => {
                        setContent(event.target.value);
                    }}
                />

                <Button
                    title="글 작성하기"
                    onClick={() => {
                        navigate("/");
                    }}
                />
            </Container>
        </Wrapper>
    );
}

export default PostWritePage;
PostViewPage.jsx
import React, { useState } from "react";
import { useNavigate, useParams } from "react-router-dom";
import styled from "styled-components";
import CommentList from "../list/CommentList";
import TextInput from "../ui/TextInput";
import Button from "../ui/Button";
import data from "../../data.json";

const Wrapper = styled.div`
    padding: 16px;
    width: calc(100% - 32px);
    display: flex;
    flex-direction: column;
    align-items: center;
    justify-content: center;
`;

const Container = styled.div`
    width: 100%;
    max-width: 720px;
    & > * {
        :not(:last-child) {
            margin-bottom: 16px;
        }
    }
`;

const PostContainer = styled.div`
    padding: 8px 16px;
    border: 1px solid grey;
    border-radius: 8px;
`;

const TitleText = styled.p`
    font-size: 28px;
    font-weight: 500;
`;

const ContentText = styled.p`
    font-size: 20px;
    line-height: 32px;
    white-space: pre-wrap;
`;

const CommentLabel = styled.p`
    font-size: 16px;
    font-weight: 500;
`;

function PostViewPage(props) {
    const navigate = useNavigate();
    const { postId } = useParams();

    const post = data.find((item) => {
        return item.id == postId;
    });

    const [comment, setComment] = useState("");

    return (
        <Wrapper>
            <Container>
                <Button
                    title="뒤로 가기"
                    onClick={() => {
                        navigate("/");
                    }}
                />
                <PostContainer>
                    <TitleText>{post.title}</TitleText>
                    <ContentText>{post.content}</ContentText>
                </PostContainer>

                <CommentLabel>댓글</CommentLabel>
                <CommentList comments={post.comments} />

                <TextInput
                    height={40}
                    value={comment}
                    onChange={(event) => {
                        setComment(event.target.value);
                    }}
                />
                <Button
                    title="댓글 작성하기"
                    onClick={() => {
                        navigate("/");
                    }}
                />
            </Container>
        </Wrapper>
    );
}

export default PostViewPage;
6) App.js 파일 수정, 애플리케이션 실행하기, Production 빌드하기
빌드 : $ npm run build
serve 설치하기
$npm install -g serve
$ serve - s build
App.js
import React from "react";
import {
  BrowserRouter,
  Routes,
  Route
} from "react-router-dom";
import styled from "styled-components";
// Pages
import MainPage from './component/page/MainPage';
import PostWritePage from './component/page/PostWritePage';
import PostViewPage from './component/page/PostViewPage';

const MainTitleText = styled.p`
    font-size: 24px;
    font-weight: bold;
    text-align: center;
`;

function App(props) {
  return (
    <BrowserRouter>
      <MainTitleText>소플의 미니 블로그</MainTitleText>
      <Routes>
        <Route index element={<MainPage />} />
        <Route path="post-write" element={<PostWritePage />} />
        <Route path="post/:postId" element={<PostViewPage />} />
      </Routes>
    </BrowserRouter>
  );
}

export default App;
index.js
import React from 'react';
import ReactDOM from 'react-dom/client';
import './index.css';
import App from './App';
import reportWebVitals from './reportWebVitals';
// import Library from './chapter_03/Library';
// import Clock from './chapter_04/Clock';
// import CommentList from './chapter_05/CommentList';
// import NotificationList from './chapter_06/NotificationList';
// import Accommodate from './chapter_07/Accommodate';
// import ConfirmButton from './chapter_08/ConfirmButton';
// import LandingPage from './chapter_09/LandingPage';
// import AttendanceBook from './chapter_10/AttendanceBook';
// import SignUp from './chapter_11/SignUp';
// import Calculator from './chapter_12/Calculator';
// import ProfileCard from './chapter_13/ProfileCard';
// import DarkOrLight from './chapter_14/DarkOrLight';
// import Blocks from './chapter_15/Blocks';

const root = ReactDOM.createRoot(document.getElementById('root'));
root.render(
  <React.StrictMode>
    <App />
    {/* <Library /> */}
    {/* <Clock /> */}
    {/* <CommentList /> */}
    {/* <NotificationList /> */}
    {/* <Accommodate /> */}
    {/* <ConfirmButton /> */}
    {/* <LandingPage /> */}
    {/* <AttendanceBook /> */}
    {/* <SignUp /> */}
    {/* <Calculator /> */}
    {/* <ProfileCard /> */}
    {/* <DarkOrLight /> */}
    {/* <Blocks /> */}
  </React.StrictMode>
);

reportWebVitals();
출력:
글목록 MainPage.jsx

글작성 PostWritePage.jsx

글 상세보기 PostViewPage.jsx

소스 : https://github.com/braverokmc79/React-firstTime


댓글 ( 4)
댓글 남기기